> For the complete documentation index, see [llms.txt](https://docs.flydean.com/www.flydean.com/llms.txt). Markdown versions of documentation pages are available by appending `.md` to page URLs; this page is available as [Markdown](https://docs.flydean.com/www.flydean.com/docs/spring/02-springboot/00041-springboot-reactive-web.md).
# 00041-springboot-reactive-web
## 41. SpringBoot中的响应式web应用
## 简介
在Spring 5中,Spring MVC引入了webFlux的概念,webFlux的底层是基于reactor-netty来的,而reactor-netty又使用了Reactor库。
本文将会介绍在Spring Boot中reactive在WebFlux中的使用。
## Reactive in Spring
前面我们讲到了,webFlux的基础是Reactor。 于是Spring Boot其实拥有了两套不同的web框架,第一套框架是基于传统的Servlet API和Spring MVC,第二套是基于最新的reactive框架,包括 Spring WebFlux 和Spring Data的reactive repositories。
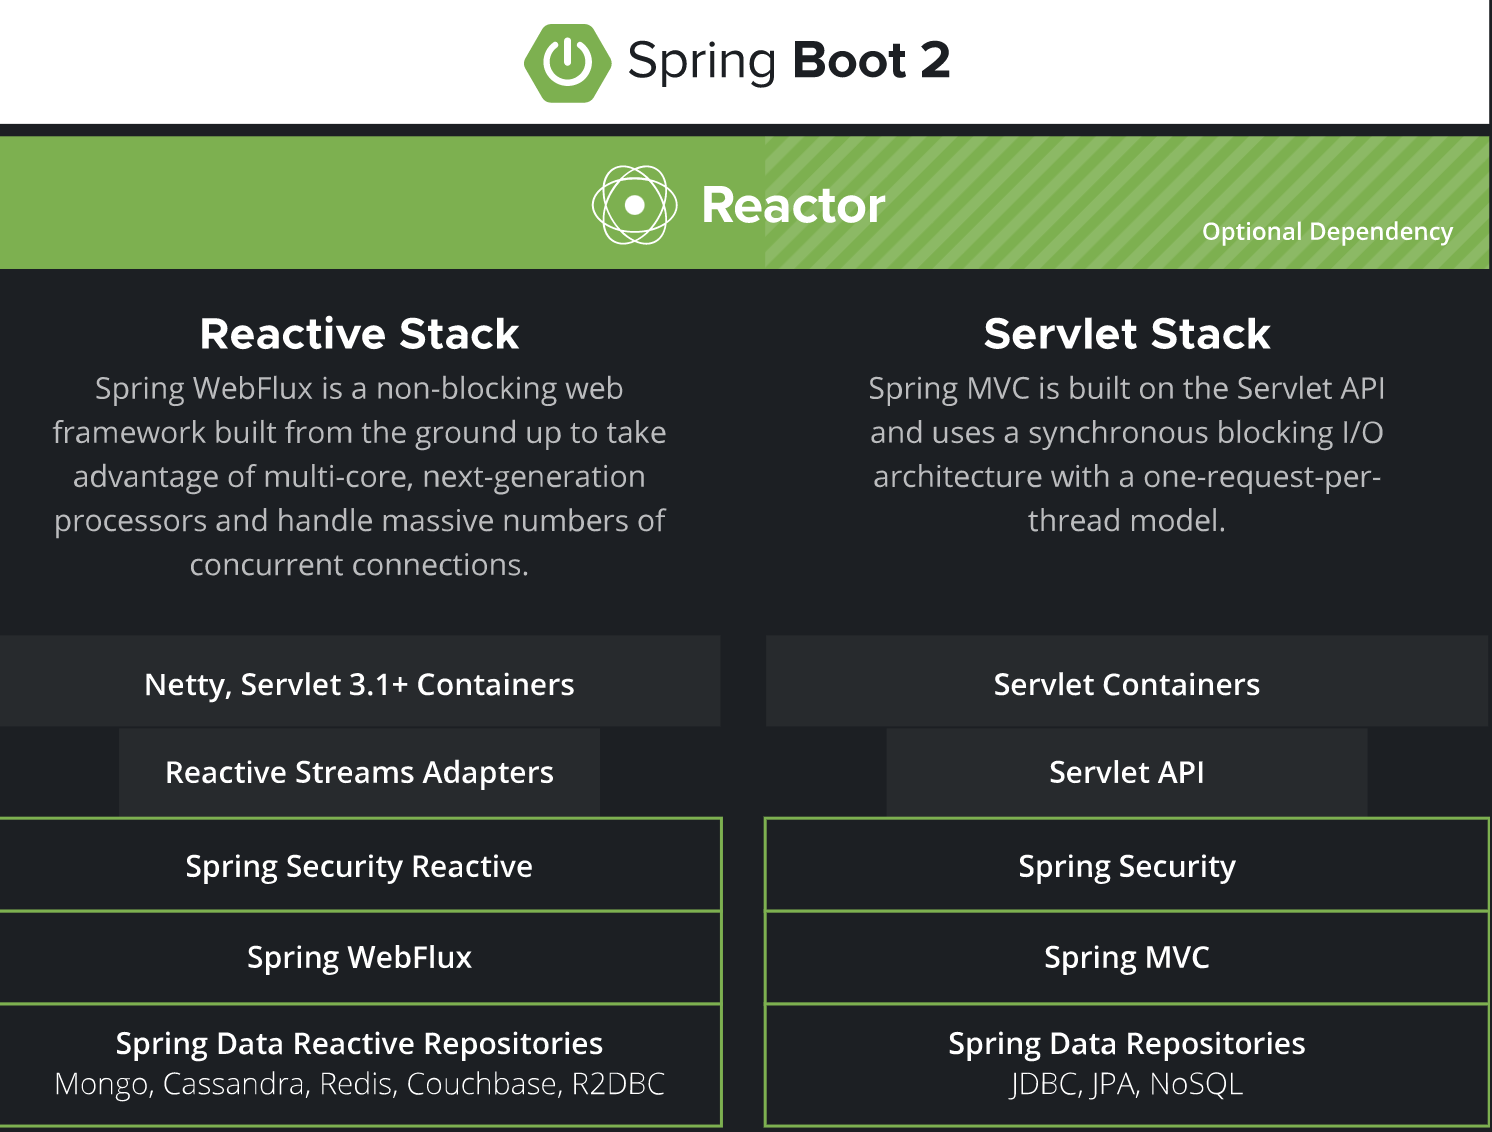
我们用上面的一张图可以清晰的看到两套体系的不同。
对于底层的数据源来说,MongoDB, Redis, 和 Cassandra 可以直接以reactive的方式支持Spring Data。而其他很多关系型数据库比如Postgres, Microsoft SQL Server, MySQL, H2 和 Google Spanner 则可以通过使用R2DBC 来实现对reactive的支持。
而Spring Cloud Stream甚至可以支持RabbitMQ和Kafka的reactive模型。
下面我们将会介绍一个具体的Spring Boot中使用Spring WebFlux的例子,希望大家能够喜欢。
## 注解方式使用WebFlux
要使用Spring WebFlux,我们需要添加如下的依赖:
```xml
org.springframework.boot
spring-boot-starter-webflux
```
只用注解的方式和普通的Spring MVC的方式很类似,我们可以使用@RestController表示是一个rest服务,可以使用 @GetMapping("/hello") 来表示一个get请求。
不同之处在于,我们请求的产生方式和返回值。
熟悉Reactor的朋友可能都知道,在Reactor中有两种产生序列的方式,一种是Flux一种是Mono,其中Flux表示1或者多,而Mono表示0或者1。
看一下我们的Controller该怎么写:
```java
@RestController
public class WelcomeController {
@GetMapping("/hello")
public Mono hello() {
return Mono.just("www.flydean.com");
}
@GetMapping("/hellos")
public Flux getAll() {
//使用lambda表达式
return Flux.fromStream(Stream.of("www.flydean.com","flydean").map(String::toLowerCase));
}
}
```
这个例子中,我们提供了两个get方法,第一个是hello,直接使用Mono.just返回一个Mono。
第二个方法是hellos,通过Flux的一系列操作,最后返回一个Flux对象。
有了Mono对象,我们怎么取出里面的数据呢?
```java
public class WelcomeWebClient {
private WebClient client = WebClient.create("http://localhost:8080");
private final Mono result = client.get()
.uri("/hello")
.accept(MediaType.TEXT_PLAIN)
.exchange();
public String getResult() {
return " result = " + result.flatMap(res -> res.bodyToMono(String.class)).block();
}
}
```
我们通过WebClient来获取get的结果,通过exchange将其转换为ClientResponse。
然后提供了一个getResult方法从result中获取最终的返回结果。
这里,我们先调用FlatMap对ClientResponse进行转换,然后再调用block方法,产生一个新的subscription。
最后,我们看一下Spring Boot的启动类:
```java
@Slf4j
@SpringBootApplication
public class Application {
public static void main(String[] args) {
SpringApplication.run(Application.class, args);
WelcomeWebClient welcomeWebClient = new WelcomeWebClient();
log.info("react result is {}",welcomeWebClient.getResult());
}
}
```
## 编程方式使用webFlux
刚刚的注解方式其实跟我们常用的Spring MVC基本上是一样的。
接下来,我们看一下,如果是以编程的方式来编写上面的逻辑应该怎么处理。
首先,我们定义一个处理hello请求的处理器:
```java
@Component
public class WelcomeHandler {
public Mono hello(ServerRequest request) {
return ServerResponse.ok().contentType(MediaType.TEXT_PLAIN)
.body(BodyInserters.fromValue("www.flydean.com!"));
}
}
```
和普通的处理一样,我们需要返回一个Mono对象。
注意,这里是ServerRequest,因为WebFlux中没有Servlet。
有了处理器,我们需要写一个Router来配置路由:
```java
@Configuration
public class WelcomeRouter {
@Bean
public RouterFunction route(WelcomeHandler welcomeHandler) {
return RouterFunctions
.route(RequestPredicates.GET("/hello").
and(RequestPredicates.accept(MediaType.TEXT_PLAIN)), welcomeHandler::hello);
}
}
```
上面的代码将/hello和welcomeHandler::hello进行了绑定。
WelcomeWebClient和Application是和第一种方式是一样的。
```java
public class WelcomeWebClient {
private WebClient client = WebClient.create("http://localhost:8080");
private Mono result = client.get()
.uri("/hello")
.accept(MediaType.TEXT_PLAIN)
.exchange();
public String getResult() {
return " result = " + result.flatMap(res -> res.bodyToMono(String.class)).block();
}
}
```
```java
public class Application {
public static void main(String[] args) {
SpringApplication.run(Application.class, args);
WelcomeWebClient welcomeWebClient = new WelcomeWebClient();
log.info("react result is {}",welcomeWebClient.getResult());
}
}
```
## Spring WebFlux的测试
怎么对webFlux代码进行测试呢?
本质上是和WelcomeWebClient的实现是一样的,我们去请求对应的对象,然后检测其返回值,最后判断返回值是否我们所期待的内容。
如下所示:
```java
@ExtendWith(SpringExtension.class)
@SpringBootTest(webEnvironment = SpringBootTest.WebEnvironment.RANDOM_PORT)
public class WelcomeRouterTest {
@Autowired
private WebTestClient webTestClient;
@Test
public void testHello() {
webTestClient
.get().uri("/hello")
.accept(MediaType.TEXT_PLAIN)
.exchange()
.expectStatus().isOk()
.expectBody(String.class).isEqualTo("www.flydean.com!");
}
}
```
## 总结
webFlux使用了Reactor作为底层的实现,和通常我们习惯的web请求方式是有很大不同的,但是通过我们的Spring框架,可以尽量保证原有的代码编写风格和习惯。
只需要在个别部分做微调。希望大家能够通过这个简单的例子,熟悉Reactive的基本编码实现。
本文的例子可以参考:[springboot-reactive-web](https://github.com/ddean2009/learn-springboot2/tree/master/springboot-reactive-web)
> 本文作者:flydean程序那些事
>
> 本文链接:[www.flydean.com](http://www.flydean.com)
>
> 本文来源:flydean的博客
>
> 欢迎关注我的公众号:「程序那些事」最通俗的解读,最深刻的干货,最简洁的教程,众多你不知道的小技巧等你来发现!